

Home
Laitteisto
How to Set Up RAID on Your PC
How to Set Up RAID on Your PC
Configuring two or more hard drives in a RAID (Redundant Array of Inexpensive Disks) setup can increase performance and/or provide automatic protection against data loss from drive failure. RAID used to be expensive, hard to implement, and limited to businesses with dedicated IT departments. Now, motherboards in most
desktop PCs
support RAID, and Windows 7 provides software RAID that requires no special hardware at all. The technology is easily within the reach of the wallet and skills of any reasonably tech-savvy PC user.
What type of RAID do I want?
RAID comes in a number of flavors—or
levels
—that offer data protection, enhanced performance, or both. In addition to the seven core levels (RAID 0 through RAID 6), you’ll encounter a number of variants and combinations. Some controllers (and dedicated external storage and NAS boxes) can layer and even abstract RAID levels, allowing you to mix and match different capacity drives and add capacity without any additional configuration.
Here are a few of the RAID levels you’ll find on affordable, consumer-level RAID adapters, motherboard chipsets, and Windows software RAID:
JBOD (extend, spill over):
JBOD, or Just a Bunch Of Disks simply allows you to extend a volume (drive letter, e.g. C:\) onto other disks. Data is written to the first disk until it’s full, then to the second disk, then the third, etc. It offers no boost in performance or redundancy and is a holdover from the days when smaller disks had to be chained to handle large amounts of data. It’s largely irrelevant given today’s more capacious hard drives.
RAID 0 (Striping):
This setup increases hard-drive performance by splitting, or
striping
, data across two drives. By leveraging two data busses, data can be read and written more quickly. Unfortunately, RAID 0 provides no data protection—in fact, it actually increases the chances of data loss since the failure of either drive in the array results in the loss of the data stored on both drives. RAID 0 setups are standard on high-end gaming PCs and graphic design workstations, and provide a measurable, albeit modest performance boost for hard-disk-intensive programs.
RAID 1 (Mirroring):
A RAID 1 setup protects data from drive failure by simultaneously writing the same data to two hard drives. Since each drive is an exact duplicate of the other, you can continue working if one fails. RAID 1 offers no gain in performance and effectively reduces available capacity by half—two 2TB drives provide only 2TB of storage.
RAID 5 (Distributed Parity):
Though you get both faster disk performance and data protection from this setup, it requires a minimum of three hard drives. Instead of using an entire hard drive as a backup, RAID 5 spreads redundancy information—called
parity bits
—across all of the array’s drives. Where RAID 1 requires 50% of available storage for redundancy, RAID 5 requires only 33%.
When one of the drives in a RAID 5 array fails, the data content of that failed drive is reconstructed using the parity bits on the surviving drives and written to a new, replacement drive. The array is still usable in the meantime.
RAID 1+0, 0+1, 10:
Some adapters combine (referred to as nesting) RAID 0 and RAID 1 to provide both data redundancy and increased disk performance. This works by either striping data across a pair of drives then mirroring (0+1) them with another pair, or striping data across two mirrored pairs (1+0, aka 10). RAID 0+1, 1+0, and 10 require a minimum of four hard drives.
What do I need to set up RAID?
A Fresh Backup (existing data only):
If you’re installing and configuring hardware RAID on a fresh system with no OS (your best option), or are adding disks for a separate array, skip this. Otherwise, back up your important data. Best practice is to have three copies of your data: the original, a backup, and a backup of the backup, preferably offsite.
If you have existing data that you want on the array, you’ll need to back it up, then restore it from a backup you make before creating your array—a process that writes new data to your hard drives regardless of what’s there. This is not necessary with Windows software RAID 0, however, it’s far faster than letting Windows re-sync (copy the data to) the mirror in the background.
How To: Configure RAID Controllers http://t.co/pd4ngciDZk #oracle
— 0x7ba07c Fri Jun 07 19:05:57 +0000 2013
Transferring an existing
operating system is tricky, and with older versions of Windows, sometimes impossible. See “Transferring Existing Windows Installations to RAID” on the next page for instructions.Windows Software RAID:
Starting with Windows XP, Microsoft integrated RAID functionality into its operating systems. What type depends on the flavor of Windows:
Windows XP allows spanned volumes (one volume over two or more disks), aka JBOD.
Windows Vista Ultimate allows JBOD and RAID 1 striping.
Windows 7 Home allows JBOD and RAID 1 while Professional and Ultimate add RAID 0 mirroring. Windows 2000 Professional also has JBOD, 0, and 1.
Windows Server operating systems from 2000 on have JBOD, 0, 1, plus support for RAID 5 distributed parity.
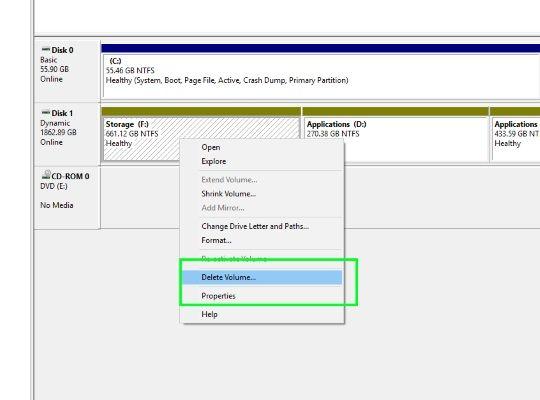
Windows RAID offers several advantages. You can create arrays from within Window Drive manager so there’s no BIOS to configure. It’s also more flexible with mirrors, allowing you to create them from existing volumes containing data, as well as delete either half of a mirror with the other remaining intact. You can mirror individual partitions, including partitions from different drives onto a single drive.
The disadvantages are that other operating systems, such as the Linux used on repair discs, can’t see Windows software RAID partitions which use Microsoft’s dynamic disk technology. Also, maintenance performed by Windows when it feels it’s needed, which can occur any time there’s a configuration change, hurts performance while in progress. Restoring mirrors isn’t as dead simple as it is with a hardware solution either.
Though you’ll see a lot of talk about hardware RAID being faster, this discussion predates modern CPUs which can easily handle the overhead. Windows RAID is actually quite fast.
RAID controller:
If you don’t use software RAID, there’s hardware. You probably already have a RAID controller in your PC; many older midrange and high-end motherboards come with secondary RAID controller, and newer motherboard chipsets offer integrated RAID obviating the need for an additional controller. Check your PC or motherboard documentation to find out if your motherboard supports RAID (and if so, which levels), and for specific installation instructions.
If your PC doesn’t have integrated RAID, you may use an adapter card. Basic PCI and PCIe adapters supporting RAID levels 0, 1, 10, and sometimes 5 can be found online for $100 or less.
Adaptec
,
Promise
and other vendors offer a wide selection of pricier, but more capable RAID adapters with onboard cache and advanced features. If possible, buy a card that supports greater-than-2.2TB disks and 6Gbps SATA III.
Two or more hard drives:
If you decide on Windows software RAID, you may use any drives you choose. They need not be the same size if you’re mirroring individual volumes, though it’s generally a good idea.
Back in the days of parallel ATA, it was a no-no to mix drives from different vendors on a RAID controller. Sometimes it would work—more often it wouldn’t. With the advent of SATA, mixing vendors is no longer as problematic.
Also, though there are controllers that allow mixing and matching capacities without losing storage space (using advanced parity techniques), these are still relatively rare. Using drives of different sizes usually results in total storage capacity that’s only a multiple of the smallest drive. For example, combining 500GB and 320GB drives in RAID 1 would be 320GB * 2, or 640GB instead of 820GB.
In practice, you’ll save yourself a lot of time and sidestep possible issues by building your array with identical hard drives—meaning drives of the same make, model, and size. You need at least two drives for RAID 0 and 1, three drives for RAID 5, and four for RAID 0+1, 1+0, and 10.
Floppy drive (Windows XP-only):
If you plan to install Windows XP on your new array, you will need a floppy disk with your RAID adapter’s Windows drivers, and a floppy drive to read it—Windows’ installation won’t install the drivers from an optical drive. Thankfully, this incredibly annoying limitation of Windows XP doesn’t apply in Windows Vista and Windows 7 which can read drivers from hard drives, flash drives, or optical media.
Tools:
You’ll need a small, non-magnetic Phillips screwdriver to remove and replace the fastener screw that secures the adapter card to the PC chassis, as well as to install any new hard drives. You might also want a simple grounding strap that attaches to your wrist; look for one at your local computer store for less than $15. Alternatively, never touch exposed contacts or electronics.
Popular Articles/span>

")
