

Home
Operating system
Why and How to Make Dell Boot from USB? Here Is the Tutorial
Why and How to Make Dell Boot from USB? Here Is the Tutorial
Summary:
Booting from USB drives is an effective solution especially when your computer is unable to start. In this post,
MiniTool Software
provides a tutorial about how to make Dell boot from USB devices. You can keep reading and have a try.
Quick Navigation :
Why do You Need to Boot from USB Devices
How to Make Dell Boot from USB Drives
Bottom Line
Dell Boot from USB FAQ
User Comments
Why do You Need to Boot from USB Devices
In daily life, you usually boot your laptops from local disks. However, in some cases, you might need to boot from USB drives. A bootable USB drive contains an operating system that can be booted and it is often used for system administration, data recovery, etc. More specifically, you might need it in the following cases:
If you encounter irreparable errors on your laptops, you can try
reinstalling the operating system
with a bootable Windows installation USB drive to solve the problem. For instance, the operating system is corrupted and you can’t start your laptop.
You can boot from USB devices and
upgrade or install an operating system
. On one hand, if you are still using an old operating system, you can
upgrade to Windows 10
by booting from a Windows Installation USB drive. On the other hand, such bootable USB devices can also help you if you want to
dual boot
two operating systems.
If you
forgot the password
of your laptop, one of the ways to unlock it is to use a password reset disk or Windows Installation USB drive to reset the password.
Here is an example from users:
How to boot from USB on Dell laptops? Get the answer in the following contents.
How to Make Dell Boot from USB Drives
To make Dell boot from USB drives, you need to create bootable USB drives at first. Then you can go to the
Dell Boot Menu
and change the boot order to boot from USB.
If you are planning to reinstall or upgrade your operating system, back up your data before the operation. If your Dell laptop didn’t run properly and you lost data, try recovering your files before you reinstall the operating system.
Are you still confused? Don’t worry. Let’s see these moves one by one with the detailed tutorial.
Move One: Create a Bootable USB Flash Drive
To upgrade to or reinstall Windows 10, you can download Windows Installation Media to create a bootable USB flash drive. And the detailed steps are listed below.
Tip:
If your Dell
laptop is dead
, you can create one on another working computer. If you have an ISO file, you can use a tool like Rufus to create a bootable USB flash drive.
Step 1
: Connect a USB flash drive that contains no important data to your Dell laptop and visit the official website of Microsoft to download the
Windows 10 Installation Media Tool
.
Step 2
: Run Windows 10 Installation Media Tool and accept the applicable notices and license terms. Then select
Create installation media (USB flash drive, DVD, or ISO file) for another PC
and click
Next
to continue.
Step 3
: Select language, architecture, and edition. Then choose your USB flash drive and wait patiently during the process of creating a bootable USB drive.
When the operation is finished, you will get a bootable USB drive that contains Windows 10 installation files. And you can go to the next move.
Move Two: Back up or Recover Your Data
Before you use the bootable Windows Installation Media to reinstall or upgrade to Windows 10, it is recommended to back up all needed data saved on the system disk. If you have an
external hard drive
, you can use it to save the backup.
It usually takes many hours to copy and paste all your files one by one, especially when there are thousands of files or they are large files. To save time, it’s wise to use a third-party data backup tool. As for the backup tool, you can try
MiniTool ShadowMaker
. And here is how to use this tool to back up files.
Step 1
: Connect your external hard drive to your Dell laptop and launch MiniTool ShadowMaker.
Step 2
: When you are asked to choose the computer to manage, select the
Connect
button under
This Computer
. Then go to the
Backup
tab.
Step 3
: Select the
Source
module, choose the items that you want to back up, and click
OK
. By default, the system required partitions are checked. If you want to back up your system only, you can skip this step.
Step 4
: When you go back to the main interface, click
Destination
. Then select a location in your external hard drive and click
OK
to save the backup.
Step 5
: Click the
Back up Now
button at the bottom right corner.
Then you just need to wait patiently until all the data is copied to your external hard drive.
If you are planning to reinstall your operating system because it is corrupted, you might need to rescue your lost data. MiniTool Partition Wizard, a wonderful disk manager and data recovery program, could help you, and you just need to:
Step 1
: Connect an unused USB flash drive to a normal computer and run MiniTool Parti
tion Wizard. Then clickBootable Media
and follow the onscreen instructions to make a bootable MiniTool Partition Wizard.
Step 2
: Connect an external hard drive which will be used to store recovered files to your Dell laptop. Then boot the laptop from the bootable USB drive you just created. As for how to boot Dell laptop from USB drive, you can refer to the guide in the next part.
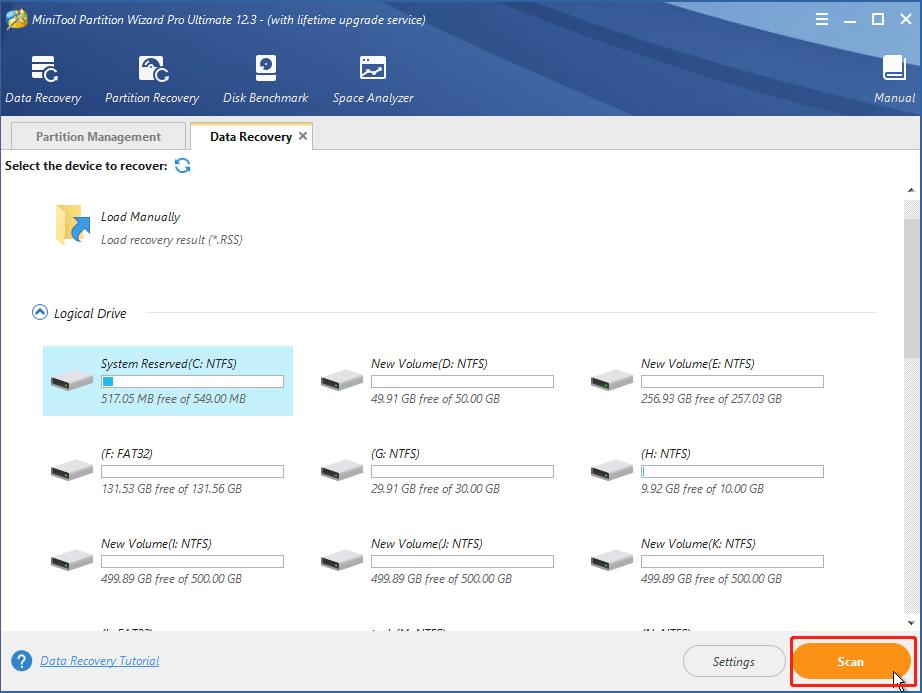
Step 3
: When you get into MiniTool Partition Wizard, click
Data Recovery
from the top toolbar.
Step 4
: Select a partition or the whole system disk and click
Scan
This is the worst fucking laptop. Its only communication ports are a MODEM and USB. Modem is of course completely u… https://t.co/DcxFrilOA3
— Sarah (Onfy) Sun Jan 12 21:02:17 +0000 2020
.
Step 5
: Check all the needed files and click
Save
. In the pop-up window, select a location on your external hard drive to store them.
After recovering your important data, you can turn off your laptop and use the bootable USB drive you made in the first move to do whatever you want without any worries.
Move Three: Make Dell Boot from USB Drives
Now, let’s talk about how to make a Dell laptop like Dell Inspiron or Dell XPS boot from USB.
How to boot from USB:
To make Dell XPS boot from USB drives, you’d better keep your laptop connected to the power cable so it won’t shut down during the process, and then follow the steps below:
Step 1
: Turn off your Dell XPS laptop and connect the USB drive that you want to boot from.
Step 2
: Turn on the laptop. When you see the Dell logo on the screen, press
F12
or
Delete
immediately to go to the boot menu.
Step 3
: Find the boot options and select your USB drive to boot from it.
What should you do if USB devices are unavailable under boot options?
If you didn’t find your USB drive in the boot options but you can access your system, you can try disabling the fast boot option to solve the problem. And here is how to do it:
Step 1
: Turn on your Dell laptop and boot from the local disk.
Tip:
You need to disconnect your USB drive during the operation.
Step 2
: Press
Win
+
I
to open Windows
Settings
.
Step 3
: Go to
System
>
Power & sleep
. Then select
Additional power settings
in the right pane.
Step 4
: In the pop-up window, select
Choose what the power buttons do
to give administrative privileges. Then click
Change settings that are currently unavailable
.
Step 5
: Uncheck the option
Turn on fast startup (recommended)
.
Then you can try to go to the Dell boot menu and check if you can make your Dell boot from USB drive.
Alternatively, to make Dell Inspiron boot from USB drive, you can also:
Step 1
: Keep your bootable USB drive connected to your Dell laptop and restart the laptop.
Step 2
: When you see the Dell logo, repeatedly tap the
F2
key to enter the BIOS setup.
Step 3
: In the left pane, expand the
POST Behavior
category and select
Fastboot
. Then in the right pane, you will see three options for Fastboot: Minimal, Thorough, and Auto. Here, you need to select
Thorough
.
Step4
: Expand the
System Configuration
. Then:
In the left pane and select
USB Configuration
. In the right pane, check Enable USB Boot Support and Enable External USB Port.
In the left pane, check
Thunderbolt Adapter Configuration
. Then check
Enable Thunderbolt Boot Support
in the right pane.
Step 5
: Select the
General
tab in the left pane. Then make sure the
Enable Legacy Option ROMs
and
Enable UEFI Network Stack
options are checked.
After that, you can restart your laptop and check whether you are able to boot Dell from your USB drive.
Bottom Line
How to boot Dell laptop from USB drives? There are generally three moves you need to take. You can have a try after reading this tutorial. If you have any ideas, you can share them with us in the following comment zone. For any problems with MiniTool software, you can contact us via
[email protected]
.
Dell Boot from USB FAQ
How do I know my USB is bootable?
If you want to check whether you made a bootable USB drive successfully, here are two ways. First, try booting a computer from this drive. Second, use a professional third-party program to check for the bootable state, such as MobaLiveCD, Magic ISO Maker, etc.
Does cloning a drive make it bootable?
It depends on how you clone your drive. If you clone the C drive only, your
cloned drive might not boot
. Conversely, if you clone all the partitions required for system startup, including the C drive, system reserved partition, or EFI system partition, your drive will be bootable.
Popular Articles/span>


