

Home
Operating system
How to properly format a new hard drive on Windows 10
How to properly format a new hard drive on Windows 10
© Provided by Windows Central
If you have a new drive, it's essential to format it to prepare the store for use, and in this guide, we'll show you how to complete this task on Windows 10.
On Windows 10, when connecting a new
internal
or
external
hard drive, it's important to spend the time to format it before storing files. You want to do this to make sure that the drive is empty, working as expected, and free of malware that might otherwise harm the current setup and files. It's also important to format the storage to ensure that it's using the proper settings to avoid compatibility problems.
Whenever you format a hard drive, the data will be deleted, since part of the process includes purging the file system table that tracks the locations of the files written on disk. The process will then define the area where files will be stored, and a compatible file system (such as NTFS, FAT32, or exFAT) will be applied to organize the new content. The system will continue to detect the previous data, but it'll identify that information as available space to store new data.
In this
Windows 10 guide
, we'll walk you through the steps to properly format a traditional hard drive or Solid-State Drive (SSD), whether it already has a partition or was never initialized.
How to format existing partition using Disk Management
How to create and format partition using Disk Management
How to format existing partition using Disk Management
When you're dealing with a drive that already has a partition, you can format the existing partition to delete its files and start with a clean storage.
To format a partition using Disk Management, use these steps:
Open
Start
.
Search for
Create and format hard disk partitions
and click the top result to open the
Disk Management
console.
Right-click the new hard drive and select the
Format
option.
© Provided by Windows Central
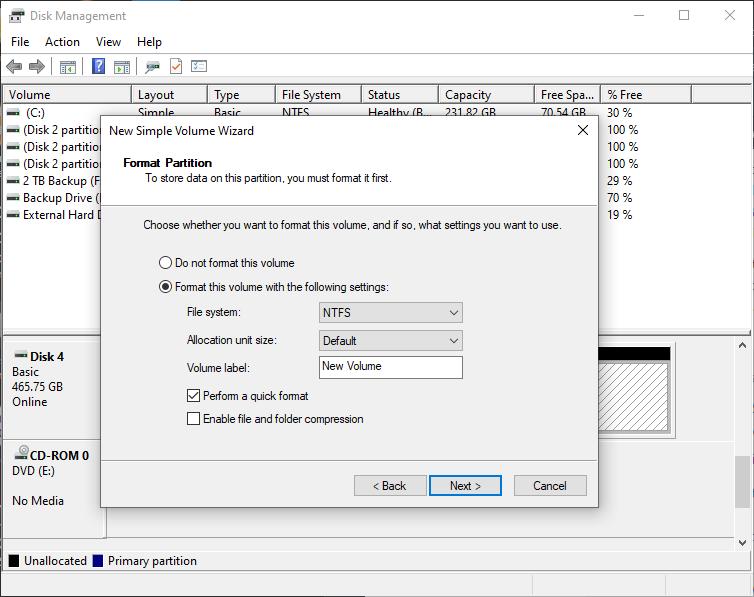
In the "Value label" field, confirm a new name for the storage.
Use the "File system" drop-down menu, and select the
NTFS
option (recommended for Windows 10).
Use the "Allocation unit size" drop-down menu, and select the
Default
option.
Check the
Perform a quick format
option.
© Provided by Windows Central
Quick tip:
The quick format option wipes the drive fast, but it doesn't check for problems. On the other hand, when clearing the option, a full format will be performed, which not only wipes the drive clean, but it'll also check for bad sectors. It's an option that could take many hours depending on the size, but it's a good practice to make sure the drive is in working conditions.
Clear the
Enable file and folder compression
option.
Click the
OK
button.
Click the
OK
button again.
Once you complete the steps, the tool will format the selected partition on the drive, and then you can begin storing files.
How to create and format partition using Disk Management
In the case that you have a hard drive that was never partitioned and formatted, it will not appear in File Explorer, and you'll have to initialize, create a new partition, and then format it before you can use it.
Usually, you can tell a hard drive doesn't have
a partition, because it will not appear in File Explorer, and on Disk Management, it'll show up as unallocated space.To set up a new hard drive with raw space on Windows 10, use these steps:
Open
Start
.
Search for
Create and format hard disk partitions
and click the top result to open the
Disk Management
console.
Right-click the hard drive marked as "Unknown" and "Not Initialized" and select the
How to Format a Hard Drive in sync With Xbox 360? https://t.co/TepOVN3VZD https://t.co/gDZylQQokn
— Evelyn Georgia Mon Apr 20 06:38:41 +0000 2020
Initialize Disk
option.
© Provided by Windows Central
Under the "Select disks" section, check the disk to initialize.
Select the partition style:
Master Boot Record (MBR)
for hard drives smaller than 2TB in size.
GUID Partition Table (GPT)
for hard drives larger than 2TB in size.
© Provided by Windows Central
Click the
OK
button.
Right-click the
Unallocated space
part of the storage, and select the
New Simply Value
option.
© Provided by Windows Central
Click the
Next
button.
Under the "Simple volume size in MB" section, leave the default size if you're planning to use the entire hard drive to store files. Otherwise, specify the amount of space in megabytes you want to allocate for the partition.
© Provided by Windows Central
Click the
Next
button.
Use the "Assign the following drive letter" drop-down menu to select a new drive letter.
© Provided by Windows Central
Click the
Next
button.
Use the "File system" drop-down menu, and select the
NTFS
option (recommended for Windows 10).
Use the "Allocation unit size" drop-down menu, and select the
Default
option.
In the "Value label" field, type a descriptive name for the storage.
Check the
Perform a quick format
option.
© Provided by Windows Central
Quick tip:
To perform a full format that includes a disk check, clear the quick format option. If you use the full format option, remember that it can take many hours to complete depending on the size.
Clear the
Enable file and folder compression
option.
Click the
Next
button.
Click the
Finish
button.
After you complete the steps, the new hard drive will be initialized, partitioned, and properly formatted.
If the drive is exhibiting problems using the Disk Management tool, as a result of data corruption or another issue, you can use the
DiskPart command-line tool to resolve the problem
.
We're focusing this guide on Windows 10, but these instructions should also work on Windows 8.1 and Windows 7.
More Windows 10 resources
For more helpful articles, coverage, and answers to common questions about Windows 10, visit the following resources:
Windows 10 on Windows Central – All you need to know
Windows 10 help, tips, and tricks
Windows 10 forum on Windows Central
Popular Articles/span>


