

Home
Operating system
How to reset a forgotten Windows 10 Administrator password?
How to reset a forgotten Windows 10 Administrator password?
To be honest. We have forgotten email, computer, and social media passwords at least once in our lives. For some people, it happens more frequently than others. Some of us will keep a backup file containing all the passwords in case this happens again. (By the way, from a security point of view, this is not the best option). Others use mnemonic technology to help them remember, while others deliberately create very simple passwords to ensure that they will not be forgotten.
Restoring a password can sure be annoying, but it’s not the end of the world. In today’s post, we will demonstrate, not one, but three different ways on how to restore a Windows 10 admin password.
Let’s get started.
How to Reset an Administrator Password on Windows 10?
So, what are the best ways to reset a forgotten Windows administrator password? Well, there are quite a few.
Option One: Reset the Windows Administrator Password with a Microsoft Account
One of the key benefits of using a Microsoft account on a Windows 10 PC is that you can easily reset your password by using Microsoft’s built-in tools. Typically, these work very well and are by far the quickest solution to go about it.
Here’s how to proceed.
The first thing you will need to do is make sure that you really can’t access your Microsoft account. There is a chance that you might have a stuck key on your keyboard, for instance, that may be getting in the way of you logging in into your account.
Head to login.live.com on another device (a different computer, your phone or tablet) and try signing in with the same Microsoft account.
If you manage to log in successfully this time, the problem clearly lies elsewhere and you will need to take a closer look at your PC keyboard.
However, if you are still having trouble logging in you will need to go ahead and reset your Microsoft password.
Here’s how to do it:
Head to the Microsoft password reset page.
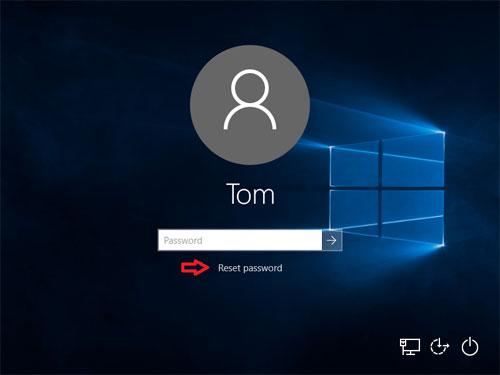
Alternatively, you can reset your password from the Microsoft login screen).
Once you’ve confirmed your identity by using your account details, you will be guided through the process of resetting your Microsoft account password.
When this is done, use the new password to sign in to your PC.
Note: You can make the whole process easier the next time you might forget your password. Use this opportunity to make some changes in the security info on your Microsoft account page. For instance, you can add a phone number and a secondary email address that can help you with the password reset process in the future.
Option Two: Reset a Local Windows Admin Password Using the Lock Screen Workaround
If you don’t use a Microsoft account to log into Windows, you will need to reset the password for your local account. How to reset a local admin password on Windows 10? Typically, in order to do this, you will need to answer a few security questions that you had provided when first setting up your account. However, if you hadn’t set up these questions, clearly this won’t be of much help.
Is the locked account is the only administrator account on your PC? If so, you will need to first enable the hidden Windows admin account to use this workaround.
However, if you have another admin account on your computer in addition to the locked one, you won’t need to go through the steps we will provide below. You can simply head to the Resetting the Password section and follow the prompts to reset your password via another admin account.
Step One: Set Up the Workaround
The first step to take here will be creating a bootable Windows 10 disk on a flash drive. Here’s how to do this using the Windows 10 Media Creation Tool. Before proceeding, make sure that you have a fast and stable Internet connection.
Download the Windows 10 Media Creation Tool from Microsoft’s official Microsoft Download Windows 10 page.
Save the tool to your PC (it should be no bigger than about 20MB).
Once this is done, launch the media creation tool and click Accept in the pop-up window.
You will now be able to choose between two options: Update this PC now and Create installation media (USB flash drive, DVD, or ISO file) for another PC. Select the latter option and click Next.
Set up your preferred settings: language, Windows 10 version, and system architecture. If you can’t make changes to these settings, clear the box called Use the recommended options for this PC and click the Next button.
Select USB flash drive, click Next and go on to select the USB drive from the list. Hit Next again to start the download of your Windows 10 installation files.
Hold on while the bootable USB Windows 10 installer is created. This may take some time — it all depends on your internet speed. So, if your internet connection is not fast enough, you may want to consider doing this in a different place with a better internet connection.
Next, insert the drive into your PC so you can boot from the new installation. On most computers, in order to do this, you will need to press F12 or a similar key once you power on your PC to choose a device to boot from.
Select booting from your flash drive and wait for the Windows installer to load.
When you see the initial Windows 10 setup screen, press the Shift + F10 key combo on your keyboard to launch Command Prompt.
Next, you need to find out which partition the Windows installation is on. In most cases, this will be drive C. However, it can be different on your PC. Enter the following command to change the current directory of the Command Prompt to C (or another drive that you think may be the right one):
If the system comes back with the following answer “The system cannot find the drive specified”, this means that the partition you’ve chosen isn’t the right one. Try another letter and run the command again.
Type the following command to access the System32 folder:
Next, we will use the Ease of Access menu to gain access to more commands. We will replace the Ease of Access shortcut with a Command Prompt link instead.
In order to do this, you will need to enter the following two commands:
Note: The first one backs up the Ease of Access shortcut so you can restore it later. Meanwhile, the second one will replace it with a Command Prompt shortcut.
Now you are done with this part of the process. You can restart your PC and head to your standard sign-in screen.
Once you are back on the sign-in screen, click the Ease of Access shortcut in the bottom-right corner of the screen to open Command Prompt: the shortcut looks like clock hands circled with a dotted line. You should find it between the power and network connection icons.
When you are in Command Prompt, use the following command to enable the default admin account:
Next, restart your PC. You can do it quickly by using this command:
Once you are back on the sign-in screen again, go to the Administrator account in the bottom-left corner. There shouldn’t be a password on this account and you should be able to log in easily. Now, you can reset your password.
Step Two: Reset Your Password
Here’s how to do this if you are using Windows 10 Pro:
Right-click the Start button and select Computer Management.
Next, go to Local Users and Groups on the left sidebar.
Expand the Users folder.
Right-click your account and select Set password to create a new password.
You will receive a warning message telling you that this may result in the loss of some data. However, most users won’t be affected by this.
Once you’ve set a new password, sign out of the admin account and log into your account.
Here’s how to do this if you are using Window
s 10 Home:Right-click the Start button and select Command Prompt (Admin).
Type in this command to see all available user accounts:
Find the name of your account.
Next, type the following command using your username:
The system will then prompt you to set a password.
Enter a new password, log off, and then log back into your account.
How to login as administrator?: I have enabled the Administrator account and set a password but I cannot l... http://bit.ly/c1HJxK #Windows
— 1Updates Fri Oct 22 14:09:44 +0000 2010
If your account has been damaged beyond repair and you can’t seem to be able to reset the password, the way out would be to create a new account and set it to be the Admin account instead.
Here’s how to do this:
Launch Command Prompt with admin privileges.
Type the following commands one-by-one, replacing USERNAME and PASSWORD with your username and password.
Once this is done, sign in to your new account with the new password.
In order to recover your files, browse to your old user directory via File Explorer:
Copy all the information you need into your new account.
Step Three: Put Everything Back
Once you’ve successfully logged into your old account or have created a new one, you will just need to go back and fix the shortcuts you’ve changed.
Reboot one more time into the Windows 10 installation disk that you’ve created earlier.
Once the welcome screen loads, press the Shift + F10 key combo on your keyboard and head to C:WindowsSystem32.
In order to put the Ease of Access shortcut back to where it was, use the following commands one at a time:
Additionally, as the default Admin account is a security risk, you should disable it. Use the following command to do this:
Use the command below to reboot your PC
And there you have it. You can now go back to using your account normally.
Option Three: Reset the Password with A Linux USB
If you’ve now realized that you can’t log into any account on your PC, you can go about it a different way. You can create a Linux drive on another PC and use it to reset your Windows account password.
Step One: Boot into Linux
The first thing you will need to do is create a bootable Linux USB drive. You can use any version of Linux but it is generally suggested that Ubuntu and Mint are the most beginner-friendly options. You can head to Ubuntu’s official website and find the instruction for how to download Ubuntu onto a flash drive.
Once you have created a bootable Linux USB drive, restart your PC and watch out for the prompt to press the F12, ESC, or Delete key or something similar to boot your device. Select your flash drive and hold on for a few minutes as Linux starts up.
Complete the setup process and then go to the File Explorer app — you should see it on the left sidebar (for Ubuntu) and in the bottom-left corner (for Mint).
Step Two: Mount Your Windows Drive
Keep your File Explorer window open and use the Ctrl + L key combo to edit the Location path.
Type in the following command to see all your available drives:
Locate the drive that you have Windows installed on.
Right-click that drive and select Mount so that Linux has access to it.
Step Three: Reset the Password
From this moment on, you will be working with the Linux Terminal.
You may feel a bit intimidated if you’ve never used Linux before but it’s actually not that complicated.
The shortcut for opening the Linux Terminal in both Mint and Ubuntu is Ctrl + Alt + T.
Then, you will need to install a password reset utility called chntpw. Type the following command to install it:
Change the working directory to your Windows folder with the following line:
Next, access the list of users by entering the following command:
You should be able to see the user password that you want to reset in this list. However, it is important to make sure that you make changes to this password only. In order to do this, you will need to type the command below where you will need to replace USER NAME with the user name whose password you need to change.
Note: if you are using a one-word username like “Alice”, you don’t need to put it in quotation marks. If you are using a multi-word username like “Alice Smith”, you will need to use quotation marks, otherwise, the command won’t work.
Type 2 to enter the editing mode.
Enter a new password for this account and press Enter to submit it,
If prompted, enter Y for yes to confirm.
If you don’t want to assign a new password, you can also choose to set it to blank. In order to do this, type 1 instead of 2 after you enter the username command. Once again, when prompted, enter Y for yes to confirm.
Restart your PC and use the new password to log in.
If you’ve set the password to blank, navigate to Settings > Accounts > Sign-in options. Here, select Password to set a new password.
How to Avoid Losing Your Password in the Future
While resetting your password on Windows is not necessarily complicated, you probably don’t want to do this often. There are several things you can do to avoid holding your password in the future.
First, make sure that you use a Microsoft account to sign in to Windows 10. This way, you will be able to easily reset your password using the web interface in case you ever forget it again.
If you don’t want to use a Microsoft account, you can set up a PIN for your Windows account, which will give you another option for resetting your password.
You can also use a built-in Windows tool that lets you create a password reset disk:
Connect a flash drive to your PC.
Open the Start Menu and run a search for “password reset disk”.
Once the tool launches, follow the prompts to create a reset disk using your flash drive.
Should you ever get locked out of your account in the future, you will be able to simply plug in the USV driver and regain access to your account.
RECOMMENDED
Protect PC from Threats with Anti-Malware
Check your PC for malware your antivirus may miss and get threats safely removed with Auslogics Anti-Malware
Auslogics Anti-Malware
is a product of Auslogics, certified Microsoft® Silver Application Developer
DOWNLOAD NOW
Finally, we also suggest you have a reliable anti-malware program running at all times on your PC. This can prevent the hijacking of your account password and other types of damage to your system. Consider using a program like
Auslogics Anti-Malware
. Once installed, the program will run automatic scans of your entire system and locate even the rarest malicious items. You will have the choice of running a Quick Scan (for a scan of key folders on your PC), Deep Scan (for scanning your entire system), and Custom Scan (for a scan of specific folders and files that you find suspicious). If any malicious items are detected, they will then be safely removed from your PC without causing any damage to your system.
With Auslogics Anti-Malware, you can also schedule flexible automatic scans to ensure that no malware sneaks into your PC. The program is easy to set up and has a simple user-friendly interface. In addition, the program is designed to run with your main antivirus software without compatibility issues-so you can keep these two programs on your PC.
Popular Articles/span>


