

Install Windows 10 on New SSD from USB
By
Petty Madison
| Last Updated: Aug. 17, 2019
As we know, SSD is much faster than traditional HDD (hard drive). It could take minutes to wait for Windows 10 going into desktop for a restart. On the contrary, only a few second is for restar on an SSD. Based on this fact, many users are upgrading their computer to new SSD and look for a way to install Windows 10 on new SSD. In this article, you will get detailed guidance on how to install Windows 10 on a brand new SSD in a few minutes.
Part 1: Preparation for Install
Part 2: Download Windows 10 ISO
Part 3: BIOS vs UEFI
Part 4: Create Bootable Windows 10 USB
Part 5: Start Installing Windows 10 on New SSD
Part 1: Preparation for Install
SSD compatibility Check
: The first thing is to check if the data port on motherboard is compatible with SSD or not. For old ones, mSata SSD is the best choice. For newer devices, NVMe SSD is more suitable nad has better reading/writing speed. After that, ensure that the SSD is properly connected to your computer with the relevant cables/wire plugged in.
Copy HDD Files to USB
: Move the important files on current HDD to USB drive so you can copy them to new SSD after installation, including documents, music, videos, ebooks, program installation files.
Write down Windows license Key
: After Windows 10 installation, you have to activate Windows 10 to unlock the advanced features. Fortunately, you can still use the same license key on Windows 10/8/7 to activate a new installation. Copy the serial number and past it into a text file.
Plug SSD to Motherboard
: Take out of SSD from package and connect SSD to motherboard with proper slots. Also make sure there are at less 60G free space is available on that SSD.
Update BIOS
(Optional): Your PC or laptop should have the newest BIOS release. Though it does not matter which slot the SSD is located, if your system instructs it should be in a specific slot position, (say) primary bay then that is the place for SSD.
Part 2: Download Windows 10 ISO
Before getting started with Windows 10 installation, you have to get a copy of Windows 10 ISO in order to
make a bootable Windows 10 install USB
or DVD. However, there is no direct download link from Windows 10 download page. There are a few hidden tricks to get the Windows 10 ISO file if you prefer to download the file Microsoft.com. Otherwise, you can use third-party tool like
HeiDoc
to download Windows 10 ISO.
Step 1
: Launch a new tab on Chrome or Microsoft Edge browser.
Step 2
: Now copy and paste the support site link of Microsoft in the address dialog:
https://www.microsoft.com/en-us/software-download/windows10ISO
Step 3
: Then hit Enter. (Getting redirected is expected default behavior.)
Step 4
: To choose the option of inspect element, right-click on the page. In case you don't get the above option, go to about:flags, browsing it from the address bar. You will get both 'Inspect element' and 'View source' from the "context menu"section.
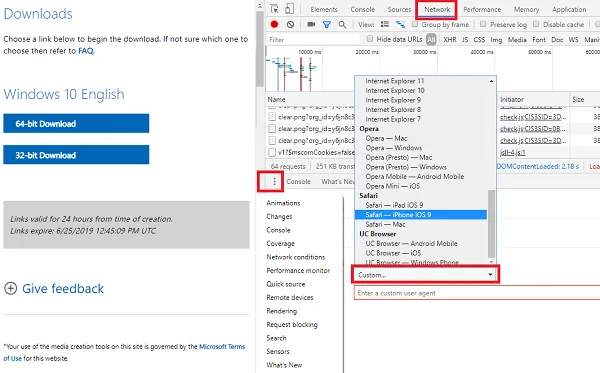
Step 5
: Hit Emulation. Then modify the user agent string to Apple Safari (iPad) from the "Mode"section. Reload the page in case the browser doesn't get refreshed on its own.
Step 6
: Choose the specific Windows 10 edition as desired and hit the Confirm key. From the drop-down section, choose your product language. Hit the Confirm button followed by hitting the download button to initiate Windows 10 ISO download.
Part 3: BIOS vs UEFI
BIOS utilizes MBR (Master Boot Record) to store the details of hard drive data. UEFI, on the other hand, uses the partition table of GUID (GPT). The key difference between both the boot types is that the former uses 32-bit entries in its partition table limiting the entire physical partition to only 4. The maximum resolution of each of the partitions can be only up to 2TB. GPT uses 64-bit entries in the partition table which substantially facilitates the size support for larger hard drive possibilities.
BIOS functions by scanning/reading the first sector of the hard drive that has the corresponding device's address to initialize or execute code. BIOS also chooses the relevant boot device, which is required to be initialized for starting the system OS. As BIOS is in use since the very beginning, it is compatible to work on 16-bit mode, restricting the amount of code to a certain limit that can be read and executed from the firmware ROM.
UEFI works similar to BIOS but in a different way. It saves all the data concerning initialization and startup in a .efi file rather than the firmware ROM. This .efi file is stored on the hard drive within the EFI System Partition (ESP). This special partition will also contain boot loader programs for Windows OS version installed on the PC.
Part 4: Create a Bootable Windows 10 USB Drive for Installation
Once you have the ISO file, create a bootable Windows install USB by
burn Windows 10 ISO to USB
with UUByte ISO Editor. This third party tool lets you create Windows 10 bootable USB drive with just a couple of clicks. Besides the
ISO burning feature
, there are another 4 useful features for ISO tasks.
With the extract option, you can access and extract folders and files to the local drive of your PC. Again, there is a facility to Create ISO file from files and folders and backup your data to ISO. Then there is the Edit function that lets you add a new file, rename, or even delete desired ISO image file contents. Follow the below-mentioned steps to get the official ISO file for installing Windows 10 with Microsoft Edge's legacy version:
Download
Windows Version
Download
Mac Version
Step 1
: First, download UUByte ISO Editor utility for Windows 10 and install it on the computer. Then launch it. Next, start the setup process from the main interface by hitting the "Burn"button.
Step 2
: Hit 'Browse' and choose the image path of Windows 10 ISO. Then choose the Radio button, "Create A Bootable USB" (In case of using DVD/CD media, pick the Create A Bootable DVD/CD option). From the Partition, style select MBR and choose NTFS for file system.
Step 3
: Choose the scheme of GPT partition in case of booting Windows 10 in UEFI mode only.
Step 4
: Hit the "Burn" button and your bootable USB will be ready within some time. Then detach the USB device from the system to use it for the latter purpose.
Download
Windows Version
Download
Mac Version
Part 5: Start Installing Windows 10 on New SSD
After above preparation, the final step is to install Windows 10 on new SSD. Please make sure SSD is recognized by the BIOS. If not, the installation will not start.
Step 1
: Insert or connect the pre-created bootable Windows 10 disk to a PC with new SSD inserted.
Step 2
: Modify the boot re in order to prevent it from getting started with OS that is already installed on the system. Usually set USB or DVD as the first booting device.
Step 3
: Once the USB is detected, the Windows 10 installation wizard appears on the screen. Then follow the on-screen instructions to
install Windows 10
on SSD.
Step 4
: Once you are done with the clean installation of Windows 10, utilize your previous activation key to activate the currently copied version of Windows 10.
Summary
Well, installing Windows 10 on new SSD is simple by following the above steps. Hopefully, the above details will guide to from scratch to do a clean installation of Windows 10 on a new SSD. You will enjoy a smooth experience with the new device. And you definitely won't regret the time spent on the new installation.
By
Petty Madison
| Post to
ISO Topic
Petty is editor in chief at UUByte and writes various topics about Windows and Mac to help people make the most of current technology.
Popular Articles/span>


